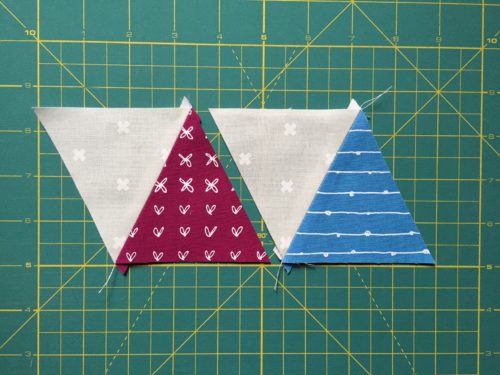
I absolutely love triangle quilts but it is an unfamiliar shape for me to sew with. It feel like everyday I need a lesson on working with them. So I decided to write these notes to help me. Maybe they’ll be useful to you too!
I’m using the Tri Tool triangle ruler. It really makes the process faster than using the angle lines on my normal ruler.
Step 1: Cut fabric strip
Decide what size you want your finished triangles. Cut a strip of fabric 1/2″ inch wider than your finished size. For this example, I decided to use 3″ triangles, so I cut a 3.5″ strip.

Step 2: Cut triangles
Place the top of the triangle ruler at the top of your fabric strip. Hold the ruler and cut fabric along the right side of the ruler (for your first triangle, you’ll also need to cut from the left side).

Turn the ruler upside down, so the top of the ruler is on the bottom of your fabric strip. The left side of the ruler should be lined up with the left side of the fabric. Hold the ruler and cut fabric along the right side of the ruler.

Continue cutting until you have all triangles cut out.

Step 3: Sewing triangles
I think it’s quickest to chain piece pairs of triangles, so that’s what method I’ll use.
Place triangles right sides together. The flat part of the top triangle should be below the bottom triangle’s point and should exactly span the width of that section.

Chain piece all triangles. Notice that the 1/4″ seam matches the width of the flat part of the top triangles.

Press triangles open. Notice the tails sticking out from the triangles. We’ll use them to help line up the next set.

Place pairs of triangles right sides together. The top triangle’s point lines up with the bottom triangle’s tail (both silver in this example). The top triangle’s tail (blue) lines up with the bottom triangle’s point (maroon).

Chain piece all triangle pairs. Notice that the 1/4″ seam lines up in the V shape created by the points lining up correctly.

Press triangles open. Continue chain piecing until all of your rows are completed!

To walk through how to sew rows of triangles together, click here for Part 2.
Linking up with Lessons Learned over at Quilting Mod

These are the best instructions I’ve seen on sewing triangles. My first quilt, I had all the questions you answered!
Thanks Christine! Glad to hear these answered questions you had when you were first using triangles!
What a great how-to. Thanks for the clear steps and tips. I’ve pieced triangles in the past but it’s always been trial and error at the start till I remember how they are supposed to go together properly. Now I’ll know where to look for reference in the future.
Thank you Paula!! Glad to hear this will be a reference for you. I’ve already re-referenced it myself
What a nice, clear tutorial. I’d love if you’d share at my linky party: http://quiltingmod.blogspot.com/2016/02/lessons-learned-linky-2.html
Thank you! I’ll go check out your linky now
Great tutorial for someone who’s never sewn triangles. Love the photos.